You can automate client onboarding with Make so every new client gets a welcome email, a private shared folder and a ready-made checklist within hours of signing, without anyone on your team copying and pasting a thing.
Daniel runs a four-person marketing agency. When a client signs, someone has to create a folder in Google Drive, share it, duplicate the onboarding checklist, write the welcome email and tell the rest of the team. It takes about 30 minutes, and it gets done differently every time. Last month a new client waited three days for a welcome email because the person who usually sends it was on vacation.
First impressions matter more than most owners think. In a 2020 survey of 216 consumers, Wyzowl found that 86% say they are more likely to stay loyal to a business that invests in onboarding content that welcomes and educates them after they buy. The sample is small, but the direction is clear: the days right after a client signs set the tone for the whole relationship.
This tutorial builds an onboarding system that runs on its own. It works on Make's free plan, and you can download the finished scenario and import it in two minutes.
What you'll build: a Make scenario that checks your client list once a day and, for every newly signed client, creates a Google Drive folder, shares it privately with the client, creates an onboarding checklist from a template, sends a welcome email, alerts your team and logs everything in the sheet.
Time: about 60 minutes (or 10 minutes with the blueprint).
Cost: $0 on Make's Free plan for most small businesses.
You need: a Google account and a free Make account.
How the onboarding scenario works
The scenario has seven modules, and each one replaces a manual step:
- Find new clients: Google Sheets searches your client list for anyone marked "signed" who hasn't been onboarded yet.
- Create their folder: Google Drive creates a folder named after the client inside your Clients folder.
- Share it privately: the folder is shared with the client's email address only, not with anyone who has the link.
- Create the checklist: Google Docs copies your onboarding template into the folder and fills in the client's details.
- Welcome the client: Gmail sends a welcome email with the next steps, the folder link and your scheduling link.
- Alert your team: a second email tells your team a new client is onboarding.
- Log it: Google Sheets records the date and folder link, so nobody gets onboarded twice.
It's the third piece of a simple client pipeline. If you haven't yet, see how to automate lead capture at the start of the funnel and invoice reminders once the work is delivered.
Before you start: the client sheet and the template
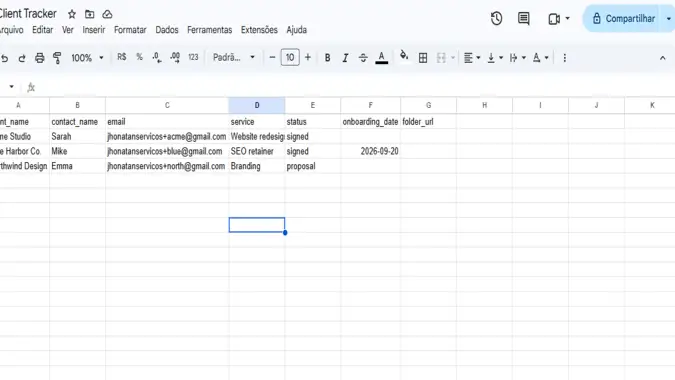
Create a Google Sheet called Client Tracker with a tab named Sheet1 and these columns in row 1: client_name, contact_name, email, service, status, onboarding_date and folder_url. Add three test rows, using your own address with a "+" alias for the emails:
- One client with status signed and an empty onboarding date (this one should be processed).
- One client with status signed and a date already filled in (should be skipped).
- One client with status proposal (should be skipped).
Format the onboarding_date column as plain text (Format > Number > Plain text) so the dates stay in the YYYY-MM-DD format Make writes.
Next, in Google Drive, create a folder called Clients. Then create a Google Doc called Onboarding Checklist Template. Words wrapped in double curly braces are fields Make will fill in:
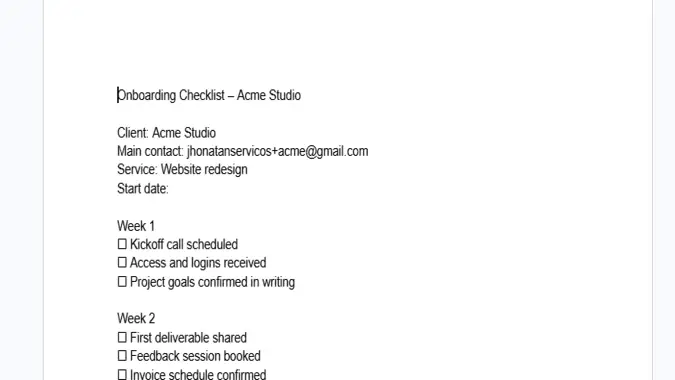
Onboarding Checklist – {{client_name}}

Client: {{client_name}}
Main contact: {{contact_name}}
Service: {{service}}
Start date: {{start_date}}

Week 1
☐ Kickoff call scheduled
☐ Access and logins received
☐ Project goals confirmed in writing

Week 2
☐ First deliverable shared
☐ Feedback session booked
☐ Invoice schedule confirmed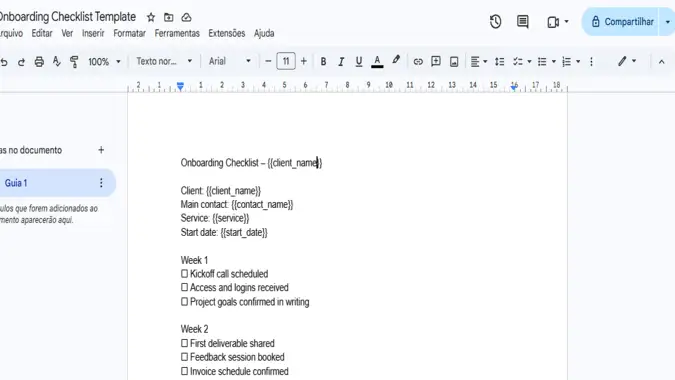
Two details that break the scenario: the field names inside the braces must be exactly client_name, contact_name, service and start_date, in lowercase. Empty braces like {{}} won't be detected. And keep the sheet tab name free of accents and special characters: a tab like "Página1" can make Make fail with an "Unable to parse range" error.
Step by step: building the scenario
If you don't have a Make account yet, you can create one for free (affiliate link, explained at the end). One thing to know first: the Free plan allows two active scenarios at a time. If you already have two running, switch one off before activating this one.
Step 1: Find newly signed clients
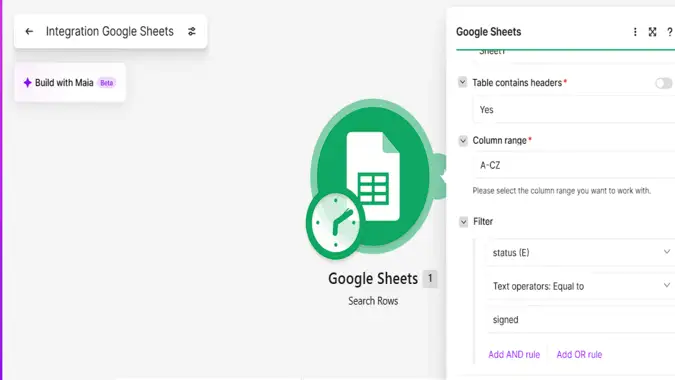
Create a new scenario called Client Onboarding. Add Google Sheets > Search Rows, connect your Google account and set:
- Spreadsheet: Client Tracker · Sheet: Sheet1 · Table contains headers: Yes
- Filter: status, Equal to,
signed
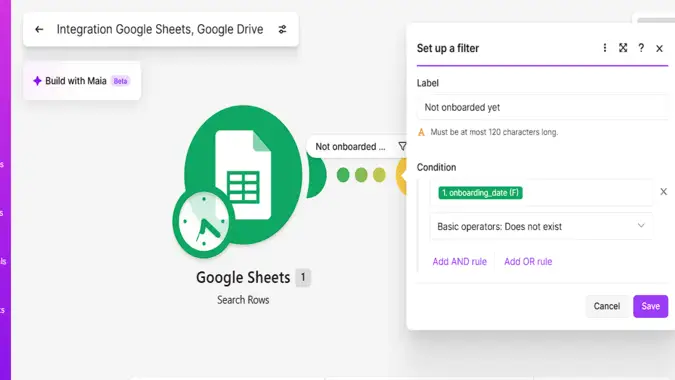
Now add the next module (Google Drive, in Step 2) so a connecting line appears. Click that line, choose Set up a filter and configure it:
- Label: Not onboarded yet
- Condition: onboarding_date, Basic operators: Does not exist
The filter inside Search Rows narrows the search in the sheet. This second filter, on the line, stops clients who were already onboarded from going any further.
Step 2: Create the client's folder
Configure Google Drive > Create a Folder:
- New Drive Location: My Drive · New Folder Location: Clients
- New Folder's Name: the client_name field followed by
– Onboarding - Share Folder: No
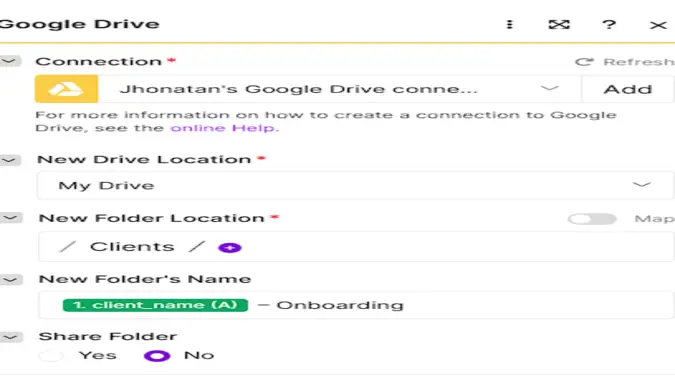
Don't use "anyone with the link" for client folders. The Share Folder option makes the folder readable by anyone who has the URL. Your welcome email asks clients to upload logos, logins and documents, so if that email gets forwarded, anyone can open the folder. Sharing with the client's email address, as in the next step, keeps it private.
Step 3 (optional but recommended): Share the folder with the client only
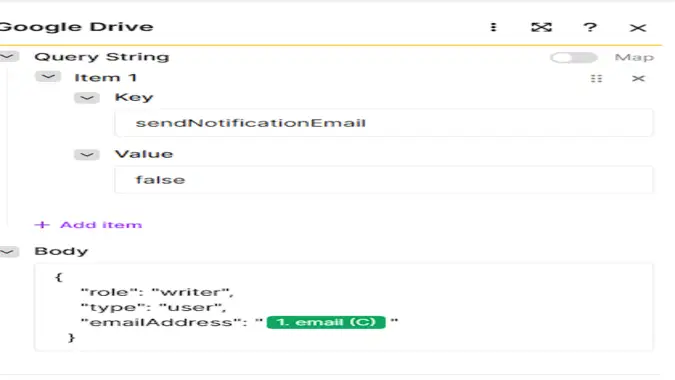
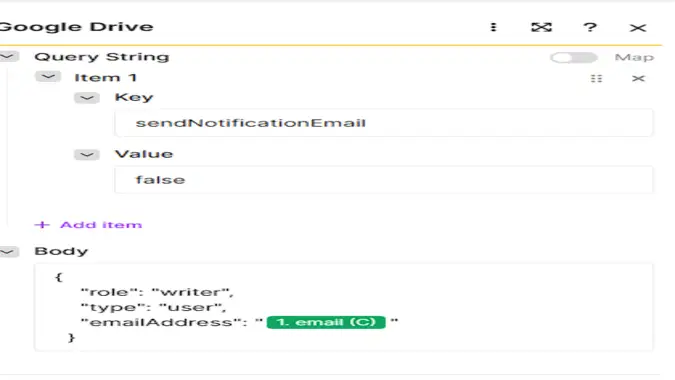
Make doesn't have a ready-made module for sharing with a specific person, so this step uses Google Drive > Make an API Call. It looks technical, but it's just four fields. If you prefer to share folders by hand, skip this step and the rest of the scenario works the same.
- URL:
/v3/files/+ the Folder ID from Step 2 +/permissions - Method: POST
- Query String: key
sendNotificationEmail, valuefalse(your welcome email already tells the client) - Body:
{
  "role": "writer",
  "type": "user",
  "emailAddress": "{{email}}"
}
Replace {{email}} with the email field from the sheet, keeping the quotation marks around it. The "writer" role lets the client upload files. Use "reader" if they only need to view.
Watch for spaces in the URL. If the URL field starts with even one space before /v3, Google returns a 404 "Not Found" error. We hit this ourselves while testing: the error message showed %20%20 in the address, which means two hidden spaces.
Step 4: Create the checklist from your template
Add Google Docs > Create a Document from a Template. It needs its own Google connection the first time. Select the Onboarding Checklist Template, and Make lists the four fields it found. Fill them in:
- client_name, contact_name, service: the matching fields from the sheet
- start_date:
{{formatDate(now; "MMMM D, YYYY")}} - Title: the client_name field followed by
– Onboarding Checklist - Location: map the Folder ID from Step 2, so the checklist lands inside the client's folder
Step 5: Send the welcome email
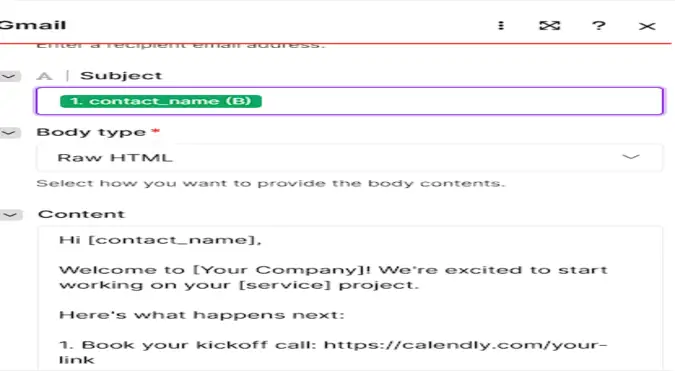
Add Gmail > Send an Email. Map the client's email in To, then use this template, clicking each field in the mapping panel where you see double curly braces:
Subject: Welcome aboard, {{contact_name}}! Here's what happens next

Hi {{contact_name}},

Welcome to [Your Company]! We're excited to start working on your
{{service}} project.

Here's what happens next:

1. Book your kickoff call: https://calendly.com/your-link
2. Your shared folder is ready: {{folder link}}
   Drop any logos, logins or documents we'll need there.
3. We'll send a short recap after the kickoff with the timeline
   and next steps.

If anything comes up before then, just reply to this email.

Talk soon,
[Your Name]
For {{folder link}}, use the Web View Link from the Create a Folder module.
Step 6: Alert your team
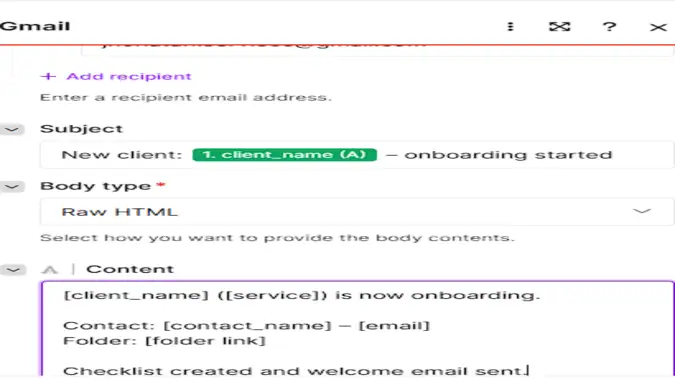
Add a second Gmail > Send an Email, addressed to yourself or a shared team inbox:
Subject: New client: {{client_name}} – onboarding started

{{client_name}} ({{service}}) is now onboarding.

Contact: {{contact_name}} – {{email}}
Folder: {{folder link}}

Checklist created and welcome email sent.
If your team lives in Slack or Microsoft Teams, swap this module for a message in a channel. The rest of the scenario stays the same.
Step 7: Log the onboarding in the sheet
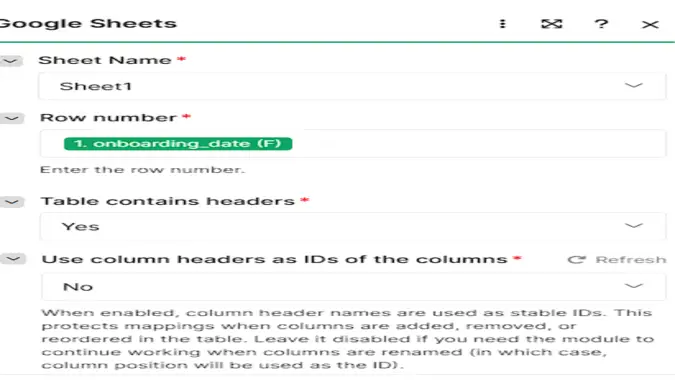
Finally, add Google Sheets > Update a Row with the same spreadsheet and tab. Map Row number from the Search Rows module, and fill in only two columns:
- onboarding_date:
{{formatDate(now; "YYYY-MM-DD")}} - folder_url: the Web View Link of the folder
Leave every other column empty so Make doesn't overwrite it. This log is what keeps the filter from Step 1 working: once a client has a date, they never go through the scenario again.
Step 8: Test and schedule
Click Run once. With the three test rows, only the signed client without a date should go through. Check that the folder exists in Drive with the checklist inside, that both emails arrived, and that the client's row now has a date and a folder link.
Then click the clock on the first module and set it to run every day at 9:00, and switch the scenario on. A client who signs in the afternoon gets their welcome the next morning. If you need faster onboarding, run it every few hours during business hours, and check the credit math below first.
What makes a welcome email work
The template above follows a few rules that are worth keeping when you adapt it:
- Lead with the next step, not with a sales pitch. The client already bought. Tell them exactly what happens now.
- Give them one clear action. Booking the kickoff call moves the project forward and shows you're organized.
- Tell them what to prepare. Asking for logos, logins and documents upfront saves a week of back-and-forth.
- Set expectations. "We'll send a recap after the kickoff" tells them they won't have to chase you.
- Invite replies. "Just reply to this email" makes an automated message feel personal.
How many credits this uses
Make bills in credits: according to its pricing page, each module action counts as one credit, and the Free plan includes 1,000 credits a month. This scenario uses:
- 1 credit per run for the search, or about 30 a month when it runs once a day.
- 6 credits per new client: folder, sharing, checklist, two emails and the sheet update.
In our own test, onboarding one client used 7 credits in total, exactly as expected. Here's the monthly picture:
| New clients per month | Daily checks | Onboarding | Total per month | Fits the Free plan (1,000)? |
|---|---|---|---|---|
| 5 | 30 | 30 | 60 | Yes |
| 20 | 30 | 120 | 150 | Yes |
| 50 | 30 | 300 | 330 | Yes |
Don't leave the default schedule. New scenarios often start at "every 15 minutes", which means 96 searches a day and about 2,880 credits a month before a single client is onboarded. That's almost three times the Free plan. Once or twice a day is plenty for onboarding.
Download the blueprint and import it in 2 minutes
If you'd rather not build it from scratch, download the finished scenario and import it into your Make account:
Download the Client Onboarding blueprint (.json)
- In Make, click Create a new scenario.
- Open the ⋯ (More) menu and choose Import Blueprint, then select the file you downloaded.
- Open each module and connect your own Google account. The blueprint doesn't include any passwords or connections.
- Reselect your own spreadsheet, template and Clients folder, and replace [Your Company], [Your Name] and the Calendly link in the emails.
- Run it once with a test row, then schedule it and switch it on.
Common mistakes (and how to fix them)
- "Unable to parse range" error: the sheet tab name has an accent or special character. Rename it to Sheet1 and reselect the spreadsheet and tab in the module.
- The checklist is created but the fields are blank: the template's placeholders are empty or misspelled. They must read exactly
{{client_name}},{{contact_name}},{{service}}and{{start_date}}. - 404 "Not Found" in the sharing step: there are spaces before
/v3in the API Call URL. Delete them so the URL starts right at the edge of the field. - "Missing value of required parameter 'rowNumber'": the Row number in Update a Row isn't mapped, or it's mapped from the wrong module. It has to come from Search Rows.
- The same client gets onboarded twice: the Update a Row module isn't writing the date, or the "Not onboarded yet" filter is missing.
- A failed test left a half-created folder: when a run stops midway, the modules before the error already ran. Delete the folder in Drive before testing again. The sheet row is untouched, so the client is still ready to be processed.
- The scenario won't switch on: the Free plan allows two active scenarios. Turn another one off, or upgrade.
Frequently asked questions
Can I automate client onboarding for free?
Yes. Make's Free plan includes 1,000 credits a month and two active scenarios. This scenario uses about 30 credits a month for daily checks plus 6 credits per new client, so a business signing 20 clients a month uses around 150 credits.
Do I need to know how to code?
No. Everything is configured in Make's visual editor. The only technical step is sharing the folder through an API call, which is just four fields to fill in, and you can skip it and share folders manually instead.
Why not just share the folder with "anyone with the link"?
Because clients often upload logins and confidential files. A link that works for anyone becomes a risk if the email is forwarded. Sharing with the client's email address keeps the folder private to them and your team.
Can I use a CRM or a form instead of Google Sheets?
Yes. Replace the Search Rows module with a trigger from your CRM, such as a deal moving to "Won", or from a form submission. The rest of the scenario works the same, as long as it receives the client's name, contact, email and service.
What's inside the blueprint file?
The blueprint contains the scenario's structure: the seven modules, the filter and the email templates. It doesn't include any passwords, connections or client data. After importing, you connect your own Google account and select your own files.
Your next step
Set up the sheet and the template, then build the scenario or import the blueprint and test it with your own email. Once it runs, every new client gets the same organized start, whether you're at your desk or on vacation. If you're deciding what to automate after this, our guide to the processes to automate first ranks the best candidates, and our Zapier vs Make vs n8n comparison helps if you're still choosing a platform.
Disclosure: the Make link in this article is an affiliate link. If you sign up for a paid plan through it, Biz Flow Craft may earn a commission at no extra cost to you. It doesn't change how we test or recommend tools.
Sources
- Wyzowl, Customer Onboarding Statistics, survey of 216 consumers, early 2020.
- Make, Pricing & Subscription Packages, Free plan limits and credit rules, checked September 2026.
- Make Help Center, Credits and operations, checked September 2026.
- Google Drive API, permissions.create, used for private folder sharing.